
A garden is a grand teacher.
It teaches patience and careful watchfulness;
above all it teaches entire trust.
~Gertrude Jekyll
Chris Long...an associate for the Home Depot stores...is writing our guest-post today. Chris very generously created the planter pictured below. He wrote this post in response to my interest in learning more about Sub Irrigated Planters a.k.a. SIP's. Mike and I currently are in the process of building our own raised bed planters...thanks to Chris's influence...and will post photos when they're planted and producing! Thanks again to Chris and to Home Depot...one of my favorite places!

Garden Liquidator: Simple Sub-Irrigated Planters
When it comes to gardening, the phrase "less is more" just doesn't apply (unless, of course, you're talking about bad things like weeds, bugs and plant diseases...). For the most part, more is going to be more. After all, who doesn't want more produce, more natural goodness and more days enjoying the fruits (and vegetables!) of your labor?
And the plants agree: they want more water. Fortunately, establishing a sub-irrigated planter (SIP) is a quick and easy way to make the most out of your crop.
By injecting the water under the surface (as opposed to the traditional method of watering above ground), more of it gets directly to the roots and you use much less water than you normally would. Since it is a closed system, there is no runoff and little overflow.
And the best part is that building one isn't as difficult as you might think. All you need are a few supplies, a good pair of gardening gloves, and a couple of hours and you've got an operational, sub-irrigated raised bed garden.
Bed Basics
The key to this super-efficient underground method of gardening is the use of perforated corrugated drain pipes. The little perforated slits that cover the pipes provide the entry and exit points for the water; there is no need for a wicking material because the soil surrounding the pipes serves as the capillary go-between that transmits the water to the roots.
*Tip: While you can also use an inverted nursery flat or a plastic food container with holes (basically anything similar with holes that won't corrode), the larger, rounded shape of the drain pipes fills up the bottom of the planter better and takes up more space in the box, resulting in the ability to use less filler or soil than average.
*Tip: While you can also use an inverted nursery flat or a plastic food container with holes (basically anything similar with holes that won't corrode), the larger, rounded shape of the drain pipes fills up the bottom of the planter better and takes up more space in the box, resulting in the ability to use less filler or soil than average.
Plus, the little notches in the corrugated drain pipe provide just the right amount of air/water needed to aerate and properly water the roots.
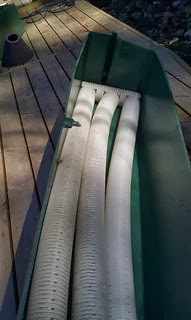
The other major material component is a fill pipe which, as its name implies, is the means through which you fill the pipes with water. Your fill pipe can be as simple as a plastic water bottle, inverted and with the bottom cut off, inserted directly into a hole you have cut into the top of one of the pipes. You can also use an extra piece of drain pipe in a corner, (as shown), that just extends to the bottom of the planter.
Finally, don't forget about an overflow drain hole - the bed's protection against overwatering - that you can cut directly into the planter.
*Tip: Although you can build your SIP directly into a wooden planter, you will greatly extend the longevity of the lumber by lining the entire inside of the box with plastic before inserting any other materials. This moisture barrier will keep the lumber's porous surface protected and will result in a much more successful, watertight raised bed garden.
And if you do go the lumber planter route, don't forget to cut an overflow drain hole into the lumber. Drill a ½" circular hole into one of the boards the planter 4" up from the bottom and insert a piece of ½" OD round vinyl tubing into it, extending it to the bottom of a pipe to ensure proper drainage. When it's time to water, just keep adding water until a little bit starts to weep out of the overflow. Refill it again the next day and you will be good to go for quite some time.
*Tip: Just remember that if you decide to go the direct-to-lumber planter method, do not use pre-treated lumber as it contains harmful toxins that can kill your plants before they have a chance to grow.
Quick Construction
Step 1: Gather the necessary materials. In this case, an SIP was constructed out of a large pontoon boat before it was placed into a lumber housing unit.

Step 2: Insert the pre-cut lengths of ventilated pipes into the container.
*Tip: When you place your pipes into the planter, be sure to space them apart evenly as these spaces form the soil wicks.

Step 3: Pour soil into the planter and cover the entire lengths of the pipes.
*Tip: When you add the soil mix to the planter, be sure to pack it down into the spaces between the pipes to ensure good capillary wicking action.


*Tip: Whether you build your SIP for use directly on the ground or raise it off the floor, it is important that the bed of your planter is flat and level. Otherwise, you are going to end up with uneven distribution of water.

Now, simply plant, water and watch as your new nursery blooms before your very eyes!
What are you planning on planting in your new sub-irrigated raised bed gardens?
~~~
Chris Long, a long-time store associate at a Home Depot in Illinois, writes on lumber products for the Home Depot website. He also enjoys writing on underground irrigation projects for gardens and lawns.
Photos: Chris Long

Photos: Chris Long


.jpg)


